本文共 23853 字,大约阅读时间需要 79 分钟。
1.写在前面
从今天开始,笔者开始介绍Spring Bean的创建过程,这块是Spring比较重要的一部分,笔者可能要花很多篇博客来介绍这个spring创建Bean的过程。这块涉及到spring各种内置的BeanPostProcessor的执行的顺序。这些BeanPostProcessor对Bean的整个生命周期起到很大的作用,从初始化到实例化到销毁等等。所以笔者打算好好讲下这些内置的BeanPostProcessor的作用及执行时机。
2.spring的内置的BeanPostProcessor有哪些?在哪录入的?
笔者先开启了一个AOP的支持,主要是通过@EnableAspectJAutoProxy注解,因为这个注解的开启的话,会添加了BeanPostProcessor,用来处理生成代理类,所以这个BeanPostProcessor,不能舍弃,笔者直接录了一个GIF,看下有几个BeanPostProcessor,具体的如下图:

通过这个GIF图,我们可以知道有7个BeanPostProcessor,具体的如下:
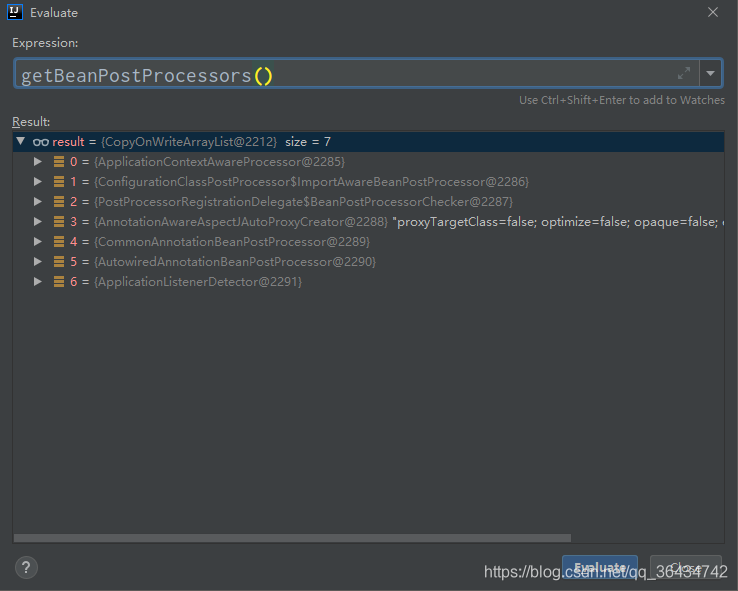
主要是这7个,这些东西是在那添加的,由笔者为你们一一道来,具体如下:
protected void prepareBeanFactory(ConfigurableListableBeanFactory beanFactory) { // Tell the internal bean factory to use the context's class loader etc. beanFactory.setBeanClassLoader(getClassLoader()); beanFactory.setBeanExpressionResolver(new StandardBeanExpressionResolver(beanFactory.getBeanClassLoader())); beanFactory.addPropertyEditorRegistrar(new ResourceEditorRegistrar(this, getEnvironment())); // Configure the bean factory with context callbacks. // 添加了一个BeanPostProcessor 为ApplicationContextAwareProcessor beanFactory.addBeanPostProcessor(new ApplicationContextAwareProcessor(this)); beanFactory.ignoreDependencyInterface(EnvironmentAware.class); beanFactory.ignoreDependencyInterface(EmbeddedValueResolverAware.class); beanFactory.ignoreDependencyInterface(ResourceLoaderAware.class); beanFactory.ignoreDependencyInterface(ApplicationEventPublisherAware.class); beanFactory.ignoreDependencyInterface(MessageSourceAware.class); beanFactory.ignoreDependencyInterface(ApplicationContextAware.class); // BeanFactory interface not registered as resolvable type in a plain factory. // MessageSource registered (and found for autowiring) as a bean. beanFactory.registerResolvableDependency(BeanFactory.class, beanFactory); beanFactory.registerResolvableDependency(ResourceLoader.class, this); beanFactory.registerResolvableDependency(ApplicationEventPublisher.class, this); beanFactory.registerResolvableDependency(ApplicationContext.class, this); // Register early post-processor for detecting inner beans as ApplicationListeners. // 添加了一个BeanPostProcessor 为ApplicationListenerDetector beanFactory.addBeanPostProcessor(new ApplicationListenerDetector(this)); // Detect a LoadTimeWeaver and prepare for weaving, if found. if (beanFactory.containsBean(LOAD_TIME_WEAVER_BEAN_NAME)) { beanFactory.addBeanPostProcessor(new LoadTimeWeaverAwareProcessor(beanFactory)); // Set a temporary ClassLoader for type matching. beanFactory.setTempClassLoader(new ContextTypeMatchClassLoader(beanFactory.getBeanClassLoader())); } // Register default environment beans. if (!beanFactory.containsLocalBean(ENVIRONMENT_BEAN_NAME)) { beanFactory.registerSingleton(ENVIRONMENT_BEAN_NAME, getEnvironment()); } if (!beanFactory.containsLocalBean(SYSTEM_PROPERTIES_BEAN_NAME)) { beanFactory.registerSingleton(SYSTEM_PROPERTIES_BEAN_NAME, getEnvironment().getSystemProperties()); } if (!beanFactory.containsLocalBean(SYSTEM_ENVIRONMENT_BEAN_NAME)) { beanFactory.registerSingleton(SYSTEM_ENVIRONMENT_BEAN_NAME, getEnvironment().getSystemEnvironment()); }} 上面的代码是在调用refresh()中的prepareBeanFactory()的方法中添加了两个BeanPostProcessor,分别是ApplicationContextAwareProcessor、ApplicationListenerDetector。
public void postProcessBeanFactory(ConfigurableListableBeanFactory beanFactory) { int factoryId = System.identityHashCode(beanFactory); if (this.factoriesPostProcessed.contains(factoryId)) { throw new IllegalStateException( "postProcessBeanFactory already called on this post-processor against " + beanFactory); } this.factoriesPostProcessed.add(factoryId); if (!this.registriesPostProcessed.contains(factoryId)) { // BeanDefinitionRegistryPostProcessor hook apparently not supported... // Simply call processConfigurationClasses lazily at this point then. processConfigBeanDefinitions((BeanDefinitionRegistry) beanFactory); } enhanceConfigurationClasses(beanFactory); //添加一个BeanPostProcessor为ImportAwareBeanPostProcessor beanFactory.addBeanPostProcessor(new ImportAwareBeanPostProcessor(beanFactory));} 上面的代码是在调用refresh()中的invokeBeanFactoryPostProcessors(beanFactory)中调用ConfigurationClassPostProcessor中的postProcessBeanFactory方法中添加的BeanPostProcessor,是ImportAwareBeanPostProcessor
public static SetregisterAnnotationConfigProcessors( BeanDefinitionRegistry registry, @Nullable Object source) { DefaultListableBeanFactory beanFactory = unwrapDefaultListableBeanFactory(registry); if (beanFactory != null) { if (!(beanFactory.getDependencyComparator() instanceof AnnotationAwareOrderComparator)) { beanFactory.setDependencyComparator(AnnotationAwareOrderComparator.INSTANCE); } if (!(beanFactory.getAutowireCandidateResolver() instanceof ContextAnnotationAutowireCandidateResolver)) { beanFactory.setAutowireCandidateResolver(new ContextAnnotationAutowireCandidateResolver()); } } Set beanDefs = new LinkedHashSet<>(8); if (!registry.containsBeanDefinition(CONFIGURATION_ANNOTATION_PROCESSOR_BEAN_NAME)) { RootBeanDefinition def = new RootBeanDefinition(ConfigurationClassPostProcessor.class); def.setSource(source); beanDefs.add(registerPostProcessor(registry, def, CONFIGURATION_ANNOTATION_PROCESSOR_BEAN_NAME)); } //添加了一个BeanPostProcessor,为AutowiredAnnotationBeanPostProcessor if (!registry.containsBeanDefinition(AUTOWIRED_ANNOTATION_PROCESSOR_BEAN_NAME)) { RootBeanDefinition def = new RootBeanDefinition(AutowiredAnnotationBeanPostProcessor.class); def.setSource(source); beanDefs.add(registerPostProcessor(registry, def, AUTOWIRED_ANNOTATION_PROCESSOR_BEAN_NAME)); } // Check for JSR-250 support, and if present add the CommonAnnotationBeanPostProcessor. //添加了一个BeanPostProcessor,为CommonAnnotationBeanPostProcessor if (jsr250Present && !registry.containsBeanDefinition(COMMON_ANNOTATION_PROCESSOR_BEAN_NAME)) { RootBeanDefinition def = new RootBeanDefinition(CommonAnnotationBeanPostProcessor.class); def.setSource(source); beanDefs.add(registerPostProcessor(registry, def, COMMON_ANNOTATION_PROCESSOR_BEAN_NAME)); } // Check for JPA support, and if present add the PersistenceAnnotationBeanPostProcessor. if (jpaPresent && !registry.containsBeanDefinition(PERSISTENCE_ANNOTATION_PROCESSOR_BEAN_NAME)) { RootBeanDefinition def = new RootBeanDefinition(); try { def.setBeanClass(ClassUtils.forName(PERSISTENCE_ANNOTATION_PROCESSOR_CLASS_NAME, AnnotationConfigUtils.class.getClassLoader())); } catch (ClassNotFoundException ex) { throw new IllegalStateException( "Cannot load optional framework class: " + PERSISTENCE_ANNOTATION_PROCESSOR_CLASS_NAME, ex); } def.setSource(source); beanDefs.add(registerPostProcessor(registry, def, PERSISTENCE_ANNOTATION_PROCESSOR_BEAN_NAME)); } if (!registry.containsBeanDefinition(EVENT_LISTENER_PROCESSOR_BEAN_NAME)) { RootBeanDefinition def = new RootBeanDefinition(EventListenerMethodProcessor.class); def.setSource(source); beanDefs.add(registerPostProcessor(registry, def, EVENT_LISTENER_PROCESSOR_BEAN_NAME)); } if (!registry.containsBeanDefinition(EVENT_LISTENER_FACTORY_BEAN_NAME)) { RootBeanDefinition def = new RootBeanDefinition(DefaultEventListenerFactory.class); def.setSource(source); beanDefs.add(registerPostProcessor(registry, def, EVENT_LISTENER_FACTORY_BEAN_NAME)); } return beanDefs;}
上面的方法是在调用构造函数中创建AnnotationConfigApplicationContext类的时候,添加了BeanPostProcessor的BeanDefinition,但是真正的添加不是在这,具体是AutowiredAnnotationBeanPostProcessor、CommonAnnotationBeanPostProcessor这两个BeanDefinition。但是没有调用对应的getBean的方法,所以这个时候的BeanPostProcessor还只是一个BeanDefinition,并不能使用,下面笔者会讲在什么时候创建这个Bean并添加到Spring的容器中的。还有一个也是AOP的代理,添加的一个BeanPostProcessor也是一个BeanDefinition,具体的如下:
@Nullablepublic static BeanDefinition registerAspectJAnnotationAutoProxyCreatorIfNecessary( BeanDefinitionRegistry registry, @Nullable Object source) { return registerOrEscalateApcAsRequired(AnnotationAwareAspectJAutoProxyCreator.class, registry, source);} 上面代码原理和上篇博客我们将@MapperScan注解的原理是一样的,就是调用了AspectJAutoProxyRegistrar类中的registerBeanDefinitions()的方法,将这个AnnotationAwareAspectJAutoProxyCreator.class类变成了BeanDefinition添加到Spring的容器中去的,至于什么时候将这个类给创建出来的,具体的代码如下:
public static void registerBeanPostProcessors( ConfigurableListableBeanFactory beanFactory, AbstractApplicationContext applicationContext) { //获取所有的实现BeanPostProcessor的接口的BeanDefinition的名字,如果不做扩展,这儿获取应该是3个(加了AOP的前提下) String[] postProcessorNames = beanFactory.getBeanNamesForType(BeanPostProcessor.class, true, false); // Register BeanPostProcessorChecker that logs an info message when // a bean is created during BeanPostProcessor instantiation, i.e. when // a bean is not eligible for getting processed by all BeanPostProcessors. int beanProcessorTargetCount = beanFactory.getBeanPostProcessorCount() + 1 + postProcessorNames.length; //添加一个BeanPostProcessor为BeanPostProcessorChecker beanFactory.addBeanPostProcessor(new BeanPostProcessorChecker(beanFactory, beanProcessorTargetCount)); // Separate between BeanPostProcessors that implement PriorityOrdered, // Ordered, and the rest. // 用来存同时实现BeanPostProcessor和PriorityOrdered接口的类 List priorityOrderedPostProcessors = new ArrayList<>(); // 用来存实现MergedBeanDefinitionPostProcessor的类,MergedBeanDefinitionPostProcessor是BeanPostProcessor接口的子接口 List internalPostProcessors = new ArrayList<>(); // 用来存同时实现BeanPostProcessor和Ordered接口的类名 List orderedPostProcessorNames = new ArrayList<>(); // 用来存只实现BeanPostProcessor接口的类名 List nonOrderedPostProcessorNames = new ArrayList<>(); // 遍历这些BeanPostProcessor,然后按照上面的规则添加到指定的list集合中去 for (String ppName : postProcessorNames) { if (beanFactory.isTypeMatch(ppName, PriorityOrdered.class)) { BeanPostProcessor pp = beanFactory.getBean(ppName, BeanPostProcessor.class); priorityOrderedPostProcessors.add(pp); if (pp instanceof MergedBeanDefinitionPostProcessor) { internalPostProcessors.add(pp); } } else if (beanFactory.isTypeMatch(ppName, Ordered.class)) { orderedPostProcessorNames.add(ppName); } else { nonOrderedPostProcessorNames.add(ppName); } } // First, register the BeanPostProcessors that implement PriorityOrdered. // 进行排序 sortPostProcessors(priorityOrderedPostProcessors, beanFactory); // 注册BeanPostProcessor,就是添加到beanPostProcessors属性中去 registerBeanPostProcessors(beanFactory, priorityOrderedPostProcessors); // Next, register the BeanPostProcessors that implement Ordered. // 用来存同时实现BeanPostProcessor和Ordered接口的类 List orderedPostProcessors = new ArrayList<>(orderedPostProcessorNames.size()); // 进行遍历将指定类的添加到指定的集合中去 for (String ppName : orderedPostProcessorNames) { BeanPostProcessor pp = beanFactory.getBean(ppName, BeanPostProcessor.class); orderedPostProcessors.add(pp); if (pp instanceof MergedBeanDefinitionPostProcessor) { internalPostProcessors.add(pp); } } // 进行排序 sortPostProcessors(orderedPostProcessors, beanFactory); // 注册BeanPostProcessor,就是添加到beanPostProcessors属性中去 registerBeanPostProcessors(beanFactory, orderedPostProcessors); // Now, register all regular BeanPostProcessors. // 存只实现BeanPostProcessor的接口的类 List nonOrderedPostProcessors = new ArrayList<>(nonOrderedPostProcessorNames.size()); // 进行遍历将指定类的添加到指定的集合中去 for (String ppName : nonOrderedPostProcessorNames) { BeanPostProcessor pp = beanFactory.getBean(ppName, BeanPostProcessor.class); nonOrderedPostProcessors.add(pp); if (pp instanceof MergedBeanDefinitionPostProcessor) { internalPostProcessors.add(pp); } } // 注册BeanPostProcessor,就是添加到beanPostProcessors属性中去 registerBeanPostProcessors(beanFactory, nonOrderedPostProcessors); // Finally, re-register all internal BeanPostProcessors. // 将实现MergedBeanDefinitionPostProcessor的类进行排序 sortPostProcessors(internalPostProcessors, beanFactory); // 注册BeanPostProcessor,就是添加到beanPostProcessors属性中去 registerBeanPostProcessors(beanFactory, internalPostProcessors); // Re-register post-processor for detecting inner beans as ApplicationListeners, // moving it to the end of the processor chain (for picking up proxies etc). // 注册ApplicationListenerDetector,就是添加到beanPostProcessors属性中去 beanFactory.addBeanPostProcessor(new ApplicationListenerDetector(applicationContext));} 上面的代码感觉beanPostProcessors的集合添加了多个相同的BeanPostProcessor,而且通过断点调试,发现也没有清除的BeanPostProcessor的集合,这个时候我们需要看下addBeanPostProcessor()方法的代码了,具体的代码如下:
public void addBeanPostProcessor(BeanPostProcessor beanPostProcessor) { Assert.notNull(beanPostProcessor, "BeanPostProcessor must not be null"); // Remove from old position, if any // 如果存在先从这个集合中删除这个BeanPostProcessor this.beanPostProcessors.remove(beanPostProcessor); // Track whether it is instantiation/destruction aware if (beanPostProcessor instanceof InstantiationAwareBeanPostProcessor) { this.hasInstantiationAwareBeanPostProcessors = true; } if (beanPostProcessor instanceof DestructionAwareBeanPostProcessor) { this.hasDestructionAwareBeanPostProcessors = true; } // Add to end of list // 最后添加进去 this.beanPostProcessors.add(beanPostProcessor);} 上面的代码就是addBeanPostProcessor()方法,走来是先删除BeanPostProcessor,如果存在的时候,删除。而List是有序的,顺序就是添加顺序,所以前面的重复添加,就是保证最后一个ApplicationListenerDetector类,然后前面的就是实现MergedBeanDefinitionPostProcessor的类。至于为什么要按照这个顺序,要看后面的Bean的生命周期。
3.Spring创建bean的过程
笔者在这说明一下,由于spring创建Bean的流程过于复杂,本篇博客的篇幅原因,所以这块肯定要分好几篇博客来讲,我们先上创建Bean的代码,具体的代码如下,至于怎么调用到下面的方法,笔者在已经介绍过,这里就不做过多的赘述,就直接上代码了。
protected Object createBean(String beanName, RootBeanDefinition mbd, @Nullable Object[] args) throws BeanCreationException { if (logger.isTraceEnabled()) { logger.trace("Creating instance of bean '" + beanName + "'"); } RootBeanDefinition mbdToUse = mbd; // Make sure bean class is actually resolved at this point, and // clone the bean definition in case of a dynamically resolved Class // which cannot be stored in the shared merged bean definition. // 获取这次要创建的Bean的Class Class resolvedClass = resolveBeanClass(mbd, beanName); // 获取的Bean的class不为空,同时BeanClass为空,BeanClassName不为空 if (resolvedClass != null && !mbd.hasBeanClass() && mbd.getBeanClassName() != null) { mbdToUse = new RootBeanDefinition(mbd); mbdToUse.setBeanClass(resolvedClass); } // Prepare method overrides. // 这个只有在方法注入的时候有用,先不讲 try { mbdToUse.prepareMethodOverrides(); } catch (BeanDefinitionValidationException ex) { throw new BeanDefinitionStoreException(mbdToUse.getResourceDescription(), beanName, "Validation of method overrides failed", ex); } try { // Give BeanPostProcessors a chance to return a proxy instead of the target bean instance. // 第一次调用BeanPostProcessor,重点来了,这个是有关于spring的Aop的 Object bean = resolveBeforeInstantiation(beanName, mbdToUse); if (bean != null) { return bean; } } catch (Throwable ex) { throw new BeanCreationException(mbdToUse.getResourceDescription(), beanName, "BeanPostProcessor before instantiation of bean failed", ex); } try { // 创建Bean Object beanInstance = doCreateBean(beanName, mbdToUse, args); if (logger.isTraceEnabled()) { logger.trace("Finished creating instance of bean '" + beanName + "'"); } return beanInstance; } catch (BeanCreationException | ImplicitlyAppearedSingletonException ex) { // A previously detected exception with proper bean creation context already, // or illegal singleton state to be communicated up to DefaultSingletonBeanRegistry. throw ex; } catch (Throwable ex) { throw new BeanCreationException( mbdToUse.getResourceDescription(), beanName, "Unexpected exception during bean creation", ex); }} 今天笔者先带大家看下第一次调用BeanPostProcessor的方法,就是resolveBeforeInstantiation(beanName, mbdToUse);方法,这个方法和AOP有关系的,直接看代码,具体的代码如下:
protected Object resolveBeforeInstantiation(String beanName, RootBeanDefinition mbd) { Object bean = null; //判断这个Bean是不是实例化之前,由于这儿还没有创建Bean,所以这个值目前是空,所以这个判断是满足的 if (!Boolean.FALSE.equals(mbd.beforeInstantiationResolved)) { // Make sure bean class is actually resolved at this point. // 判断这个不是合成类,什么是合成类?下面会讲 // 判断hasInstantiationAwareBeanPostProcessors是不是为true。这个值在什么时候会改变?下面回讲 if (!mbd.isSynthetic() && hasInstantiationAwareBeanPostProcessors()) { // 获取源对象,这里是A,因为断点调试的是A,如果提供的FactoryMethodName方法,就会返回对应FactoryMethodName方法返回的值 Class targetType = determineTargetType(beanName, mbd); if (targetType != null) { //调用对应的后置处理器BeanPostProcessor bean = applyBeanPostProcessorsBeforeInstantiation(targetType, beanName); if (bean != null) { //同样调用对应的后置处理器BeanPostProcessor bean = applyBeanPostProcessorsAfterInitialization(bean, beanName); } } } //如果这儿的Bean不等于null,将beforeInstantiationResolved改成true mbd.beforeInstantiationResolved = (bean != null); } return bean;} 看着上面的注释,笔者来一一解答问题,判断hasInstantiationAwareBeanPostProcessors是不是为true(默认是为false)。这个值在什么时候会改变?这个值是在调用addBeanPostProcessor()方法的时候改变的,具体的代码如下:
public void addBeanPostProcessor(BeanPostProcessor beanPostProcessor) { Assert.notNull(beanPostProcessor, "BeanPostProcessor must not be null"); // Remove from old position, if any this.beanPostProcessors.remove(beanPostProcessor); // Track whether it is instantiation/destruction aware if (beanPostProcessor instanceof InstantiationAwareBeanPostProcessor) { this.hasInstantiationAwareBeanPostProcessors = true; } if (beanPostProcessor instanceof DestructionAwareBeanPostProcessor) { this.hasDestructionAwareBeanPostProcessors = true; } // Add to end of list this.beanPostProcessors.add(beanPostProcessor);} 所以从上面可以得出一个结论就是如果添加了实现InstantiationAwareBeanPostProcessor接口的类,这个值就会变成true,那么我们之前添加的7个BeanPostProcessor,有实现这个接口的类吗,很明确告诉你有。我们下面的图:
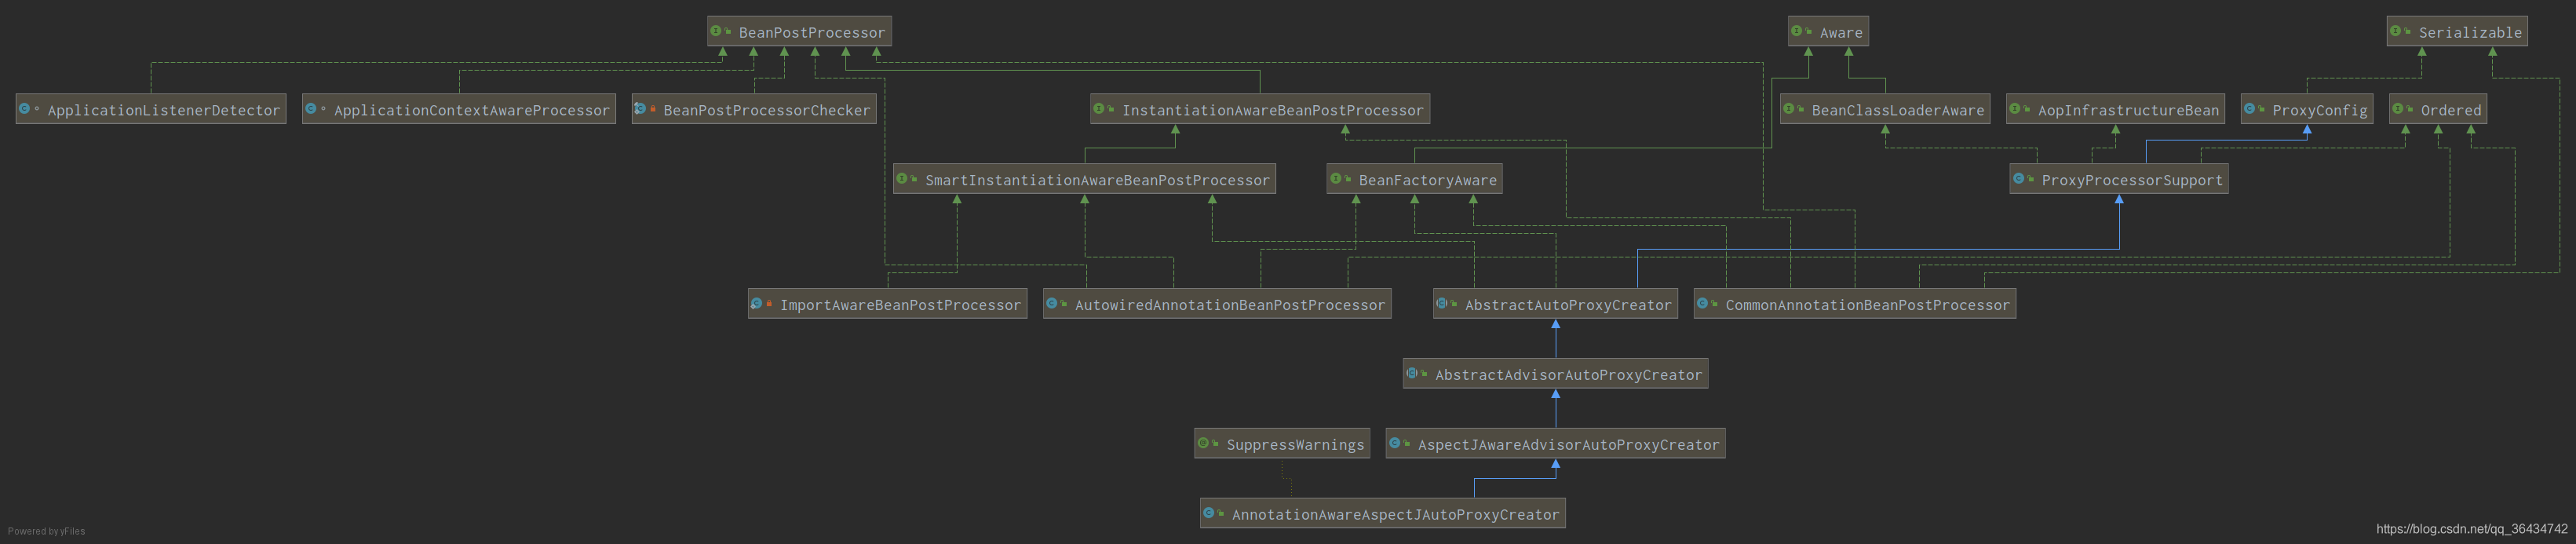
我们可以看到ImportAwareBeanPostProcessor、AutowiredAnnotationBeanPostProcessor、AnnotationAwareAspectJAutoProxyCreator、CommonAnnotationBeanPostProcessor这几个类都实现了InstantiationAwareBeanPostProcessor接口,所以可以得知这个hasInstantiationAwareBeanPostProcessors的值为true。
那么回答第二个问题,什么是合成类?废话不多说,笔者直接上代码:
package com.ys.beanLife;import java.lang.reflect.Constructor;import java.lang.reflect.Method;public class Synthetic { public void test() { SyntheticInner inner = new SyntheticInner(); System.out.println(inner.s); } private class SyntheticInner { private SyntheticInner() { } private String s = ""; } public static void main(String[] args) throws NoSuchMethodException { for (Method declaredMethod : Synthetic.class.getDeclaredMethods()) { System.out.println(Synthetic.class.getSimpleName() + ":" + declaredMethod.getName() + ":" + declaredMethod.isSynthetic()); } for (Method declaredMethod : SyntheticInner.class.getDeclaredMethods()) { System.out.println(SyntheticInner.class.getSimpleName() + ":" + declaredMethod.getName() + ":" + declaredMethod.isSynthetic()); } for (Constructor declaredConstructor : SyntheticInner.class.getDeclaredConstructors()) { System.out.println(SyntheticInner.class.getSimpleName() + ":" + declaredConstructor.getName() + ":" + declaredConstructor.isSynthetic()); } }} 运行结果如下:
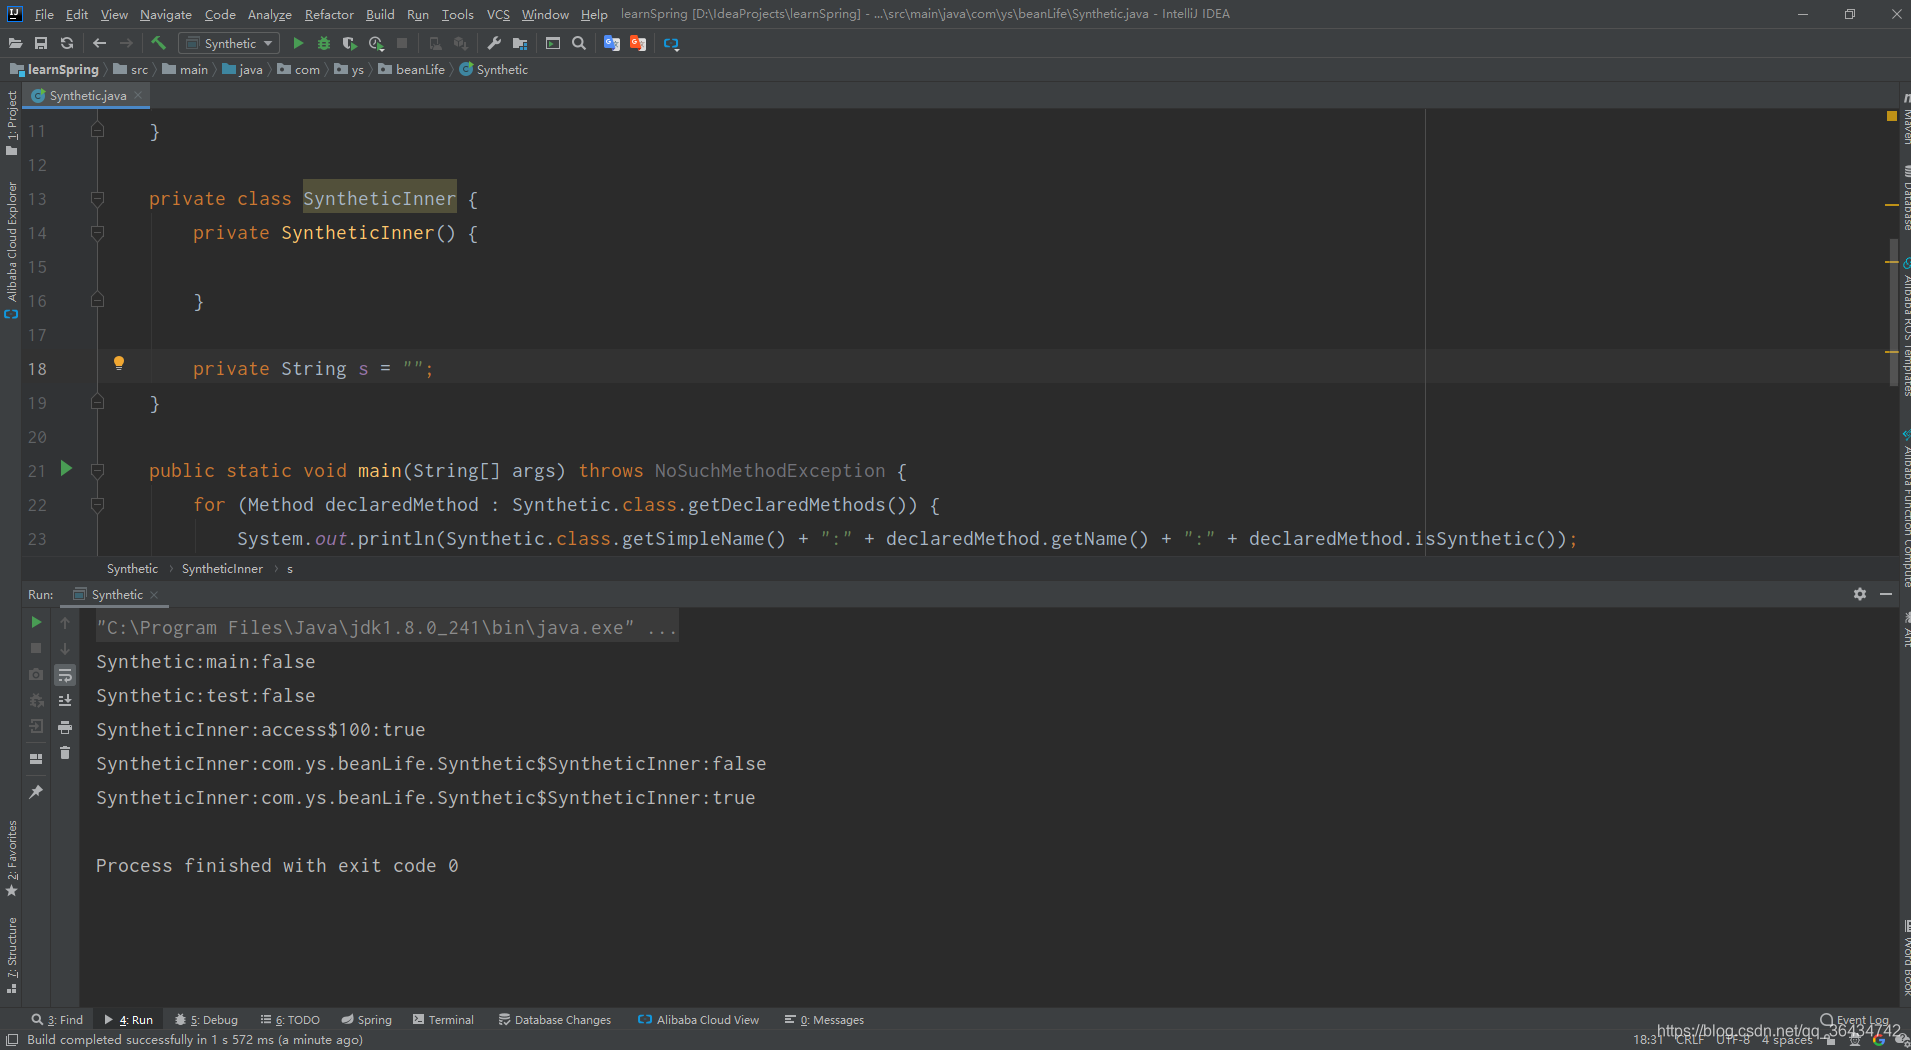
可以发现多了两个方法,这两个是Java虚拟机帮我们生成的,所以这两个方法就是合成的方法。通俗的讲:JVM帮我们生成的类或方法,就是合成的类或方法。
这两个问题解决了,我们该要看调用后置处理器的方法了applyBeanPostProcessorsBeforeInstantiation(targetType, beanName);,具体的代码如下:
protected Object applyBeanPostProcessorsBeforeInstantiation(Class beanClass, String beanName) { //遍历所有的BeanPostProcessor,这儿取出来的是7个 for (BeanPostProcessor bp : getBeanPostProcessors()) { //判断这个BeanPostProcessor是不是InstantiationAwareBeanPostProcessor,上面的说到的,只有四个满足,所有分别会执行这四个的postProcessBeforeInstantiation方法。 if (bp instanceof InstantiationAwareBeanPostProcessor) { InstantiationAwareBeanPostProcessor ibp = (InstantiationAwareBeanPostProcessor) bp; Object result = ibp.postProcessBeforeInstantiation(beanClass, beanName); if (result != null) { return result; } } } return null;} 第一次执行:ImportAwareBeanPostProcessor中的postProcessBeforeInstantiation的方法,具体的代码如下:
public Object postProcessBeforeInstantiation(Class beanClass, String beanName) throws BeansException { return null;} 这个类中这个方法什么操作也没有做,直接返回空。
第二次执行:AnnotationAwareAspectJAutoProxyCreator中的postProcessBeforeInstantiation的方法,具体的代码如下:
public Object postProcessBeforeInstantiation(Class beanClass, String beanName) { //简单的理解就是获取beanName,如果这个BeanClass是FactoryBean的话,就加上&,如果beanName的长度为0直接返回BeanClass //这儿返回的是a Object cacheKey = getCacheKey(beanClass, beanName); //如果beanName的长度等于0 或者targetSourcedBeans不包含这个beanName(这儿targetSourcedBeans为空) if (!StringUtils.hasLength(beanName) || !this.targetSourcedBeans.contains(beanName)) { //不需要代理的类,这儿查出来的是两条记录,一个切面的类,一个配置类 if (this.advisedBeans.containsKey(cacheKey)) { return null; } //判断是Advice或者Pointcut或者Advisor再或者是AopInfrastructureBean,还有就是确定给定的bean名称是否指示“原始实例” //这些类全部添加到不需要代理的类的集合中 if (isInfrastructureClass(beanClass) || shouldSkip(beanClass, beanName)) { this.advisedBeans.put(cacheKey, Boolean.FALSE); return null; } } // Create proxy here if we have a custom TargetSource. // Suppresses unnecessary default instantiation of the target bean: // The TargetSource will handle target instances in a custom fashion. // 如果我们有自定义的TargetSource,请在此处创建代理。 // 禁止不必要的默认目标bean实例化 // TargetSource将以自定义方式处理目标实例。 // 这个返回的值一般会空 TargetSource targetSource = getCustomTargetSource(beanClass, beanName); if (targetSource != null) { if (StringUtils.hasLength(beanName)) { this.targetSourcedBeans.add(beanName); } Object[] specificInterceptors = getAdvicesAndAdvisorsForBean(beanClass, beanName, targetSource); Object proxy = createProxy(beanClass, beanName, specificInterceptors, targetSource); this.proxyTypes.put(cacheKey, proxy.getClass()); return proxy; } return null;} 上面的代码就是判断这个bean是否在advisedBeans中,如果在,直接返回null,同时如果是一些特殊类,也是直接put到advisedBeans中直接返回,如果设置的targetSource,直接在这儿获取到,同时添加到targetSourcedBeans集合中去,在这里就完成了代理,至于这儿的作用,后面的博客会详细说。
第三次执行:CommonAnnotationBeanPostProcessor中的postProcessBeforeInstantiation方法,具体的代码如下:
@Overridepublic Object postProcessBeforeInstantiation(Class beanClass, String beanName) { return null;} 这个类中这个方法什么操作也没有做,直接返回空。
第四次执行:AutowiredAnnotationBeanPostProcessor中postProcessBeforeInstantiation的方法,由于这个类继承了InstantiationAwareBeanPostProcessorAdapter,在AutowiredAnnotationBeanPostProcessor类中没有覆盖父类中的这个方法,所以这儿调用的是InstantiationAwareBeanPostProcessorAdapter中的postProcessBeforeInstantiation的方法,具体的代码如下:
@Override@Nullablepublic Object postProcessBeforeInstantiation(Class beanClass, String beanName) throws BeansException { return null;} 这个类中这个方法什么操作也没有做,直接返回空。
到此第一次调用BeanPostProcessor就结束了,我们返回到原来的代码。
protected Object resolveBeforeInstantiation(String beanName, RootBeanDefinition mbd) { Object bean = null; //判断这个Bean是不是实例化之前,由于这儿还没有创建Bean,所以这个值目前是空,所以这个判断是满足的 if (!Boolean.FALSE.equals(mbd.beforeInstantiationResolved)) { // Make sure bean class is actually resolved at this point. // 判断这个不是合成类,什么是合成类?下面会讲 // 判断hasInstantiationAwareBeanPostProcessors是不是为true。这个值在什么时候会改变?下面回讲 if (!mbd.isSynthetic() && hasInstantiationAwareBeanPostProcessors()) { // 获取源对象,这里是A,因为断点调试的是A,如果提供的FactoryMethodName方法,就会返回对应FactoryMethodName方法返回的值 Class targetType = determineTargetType(beanName, mbd); if (targetType != null) { //调用对应的后置处理器BeanPostProcessor bean = applyBeanPostProcessorsBeforeInstantiation(targetType, beanName); if (bean != null) { //同样调用对应的后置处理器BeanPostProcessor bean = applyBeanPostProcessorsAfterInitialization(bean, beanName); } } } //如果这儿的Bean不等于null,将beforeInstantiationResolved改成true mbd.beforeInstantiationResolved = (bean != null); } return bean;} 那么就有一个问题,这个bean在什么时候不是为空,我们通过前面的代码可以得知,就是在调用AnnotationAwareAspectJAutoProxyCreator中的postProcessBeforeInstantiation的方法的时候,用户自定义的targetSource的值不为空,这个后面博客会讲到,由于篇幅的原因,今天的博客就讲到这。
4.写在最后
整个Spring创建Bean的过程比较庞大,一篇博客肯定是讲不完的,笔者打算分几次讲,今天的这篇博客就到此结束了。
转载地址:http://cezcz.baihongyu.com/